How to: Create & Connect to Azure SQL Relational Database without any experience
- Drew Clark

- Feb 11, 2020
- 5 min read
Follow this guide to create a SQL database in azure, create a table with schema, create constraints, add data with SQL, and connect to your database with Azure Data Studio and SQL Server Management Studio (SSMS).
Create an account and login
Create Azure Account by clicking here.
Login to azure portal by clicking here.

Create an example user
Search for Azure Active Directory in the search bar at the top of the window.

Click Users from the menu on the left.

Click New User

Enter in a Username, Name, First Name and Last Name.
Choose to either Auto-generate a password for the account or create your own password for the account, just make sure to remember this password or show the auto-generated one.

Click create at the bottom.
You have successfully created a new user account to act as the admin for the SQL server.
How to Create & Configure a SQL Database and Server
Search for SQL Databases in Azure search box at the top of the window.

Click Add to create a new SQL Database in the top left corner.

The Create SQL Database window will pop up.
First, Navigate to the second item called Resource group. Under the drop down, click Create New. Give this a very simple name. I am building a legal application so I am going to call it legalGroup.

Under Database details shown in the image above, lets give the Database a name. I am going to just call this the legalcontracts database because it will house legal records. I changed it to legal contracts after I took the screen shot above.
Under the Server drop down select Create New. A window will appear on the side of the screen.

Give the server a simple name. I am using legalserver.
Enter a username and password for the admin login, try not to use words like admin.
Click OK in the bottom left corner.
In the Server drop down, make sure the server you just created has been selected.
Leave everything else as it is.
Click Review & Create at the bottom of the window.
Click Create at the bottom. This will begin the creation of your SQL server and database. Give it a few minutes and then refresh the page.

You have successfully created a SQL database hosted on an Azure server. Now we need to connect to the server.
How to connect to a SQL Server hosted on Azure with SQL Server Management Studio (SSMS)
Open SSMS once it has finished installing.
Click Connect in the top left window. This will open a window to connect to the database.

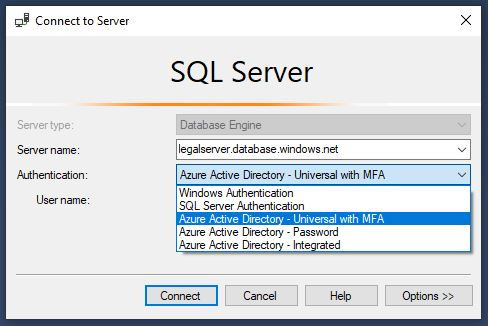
Notice the input box for Server Name, we need to get this from the database online.

Go to the azure server page by clicking on home and then click on the server we created earlier.
Copy the Server Name from the right side of the screen and paste into the corresponding input box on SSMS.

Change the Authentication to Azure Active Directory - Universal with MFA.
For Username, enter the email for the example account you created earlier. If you don't remember it, just type in Azure Active Directory into the Azure search box. Click on users and you will see the example account you created earlier.
Copy and paste the email into the corresponding username input box in SSMS.
Click Connect.
You will get an error saying your IP Address does not have access to the server. Lets set your example user as the admin for this database and grant your IP address access to the server.

How to set Example User as the Active Directory Admin
Go to the azure server page by clicking on home and then click on the server we created earlier.
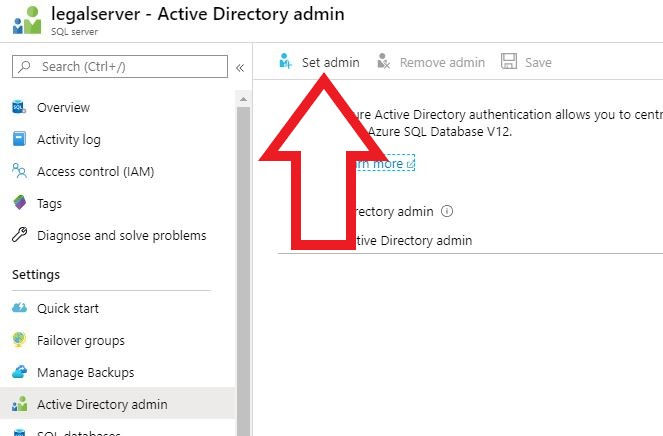
Click on Active Directory admin, under the settings section on the left hand side of the window or in the middle.

Click on Set admin.
Select Example User, click Select in the bottom left hand corner.
Click Save.

How to grant your IP Address access to the server
On the azure server page, scroll down the menu on the left and click on Firewalls and Virtual Network under the Security Section.

Click Add Client IP, a new IP address will be added in for your computer.

Rename the IP Address Rule Name so that you can identify which computer has access. I changed it to show the connection is from my main office computer. Click Save.

Go back to SSMS, click cancel on the error message from before.

Click connect again.
A window may appear asking you to login. Enter the password for the example account. If this is the first time logging the account in. It may ask you to change the password, remember it if you must.

Click Sign in and SSMS should connect, if you have any issues, make sure the IP address has been added into the Firewalls and Virtual Networks menu and your account has been added as the Active Directory Admin.
How to create a table in our SQL database
You will see folders for Databases, Security, and Integration Services Catalogs.
Click the plus button to the left of the Databases folder to expand it.
Now choose the database we created earlier.

Click New Query in the menu above.

Copy and paste the example below into the window and click Execute next to the green play button, right below New Query.
CREATE TABLE People (
FirstName varchar(255) CHECK (len(FirstName)>3 AND len(FirstName)<40),
LastName varchar(255),
Age int CHECK (Age<=130),
Street varchar(255),
City varchar(255),
USState varchar(2),
Zip varchar(5)
);

Explanation:
varchar sets the limit of how many characters are allowed for that data point.
The other condition CHECK and len make sure that the first name is longer than 3 characters, but less than 40.
int makes sure that the Age is a number and is less than 130 years old.
You should see Commands completed successfully in the messages window.
Click the expand button next to the Tables folder in your database, you will see a new table called dbo.People. If you do not see this table click the blue refresh button above in the Object Explorer window.

How to add data to the new table
In the Query window from above, paste in the example below and click Execute next to the green play button, right below New Query.
INSERT INTO People (FirstName, LastName, Age, Street, City, USState, Zip)
VALUES ('Drew','Clark',26,'476 5th Ave','New York City','NY','10018');
SELECT * FROM People;

This will add in a record for myself and the location of Bryant Park in New York City. You will see a table of results displaying the new data below the Query.
How to connect to the SQL database with Azure Data Studio
Download and Install Azure Data Studio by clicking here.
Once Azure Data Studio opens up, a window will appear on the right hand side of the screen labeled connection. Find the Server input box under connection details, you will need to fill this in with the SQL Server Name we found earlier.

Go to your Azure server and copy the Server Name on the right hand side and paste it into Azure Data Studio Server Name input box as shown in the second item above.
In SSMS, change Authentication type to Azure Active Directory - Universal with MFA Support
Click the Database drop down, and select Add an account.

Copy and paste the Website URL into a browser.

When prompted, copy and paste the User code into the corresponding input online.

Sign in with the example account we created earlier.

You will receive a message saying you have signed into Azure Data Studio on your device, you can close this browser window.

You should now see the example account you created inside the account input box.

Click the drop down next to Database. Allow it to load for a few seconds. Choose the SQL Database we created earlier.

Click Connect at the bottom.
Expand the server item under connections.
You should see the tables folder. Expand it and you should see the dbo.People table from the example earlier.
Right click on this table and click "Select Top 1000'. You will see a new query and your data that you entered in before.

We have successfully connected to your Azure SQL Database with Azure Data Studio.


The Azure SQL database guide explained the setup process in a simple and easy to follow way. I liked how it broke each step into manageable parts for beginners. While learning database concepts for class, I used assignment editing service to improve the clarity of my coursework. It reminded me that clear instructions make technical topics much easier to understand.